自动化测试
功能测试,工具类还是要用单元测试
新建Util类
文档管理工具swagger//todo
销售端
产品查询 申购赎回 对账
jsonrpc
添加全局依赖1
2
3
4
5
6ext {
libs = [
jsonrpc:[
"com.github.briandilley.jsonrpc4j:jsonrpc4j:1.5.1"
],]
}
添加到api模块1
2
3dependencies{
compile libs.jsonrpc
}
添加entity依赖
新建接口api-ProductRpc1
2
3
4
5
6
7
8
9
10
11
12
13
14
15("rpc/products")
public interface ProductRpc {
/**
* 查询多个产品
* @param req
* @return
*/
List<Product> query(ProductRpcReq req);
/**
* 查单个产品
* @param id
* @return
*/
Product findOne(String id);
将参数复杂的接口的参数封装到请求对象
api-domain1
2
3
4
5
6public class ProductRpcReq {
private List<String> idList;
private BigDecimal minRewardRate;
private BigDecimal maxRewardRate;
private List<String> statusList;
}
修改manger添加api依赖1
compile project(":api")
在管理端新建包rpc
rpc实现类1
2
3
4
5
6
7
8
9
10
11
12
13
14
15
16
17
18
19
20
21
22
23
24
25
public class ProductRpcImpl implements ProductRpc {
private static Logger LOG = LoggerFactory.getLogger(ProductRpcImpl.class);
private ProductService productService;
public List<Product> query(ProductRpcReq req) {
LOG.info("查询多个产品:{}",req );
Pageable pageable = new PageRequest(0,1000, Sort.Direction.DESC,"rewardRate");
Page<Product> page = productService.query(req.getIdList(), req.getMinRewardRate(),
req.getMaxRewardRate(), req.getStatusList(), pageable);
LOG.info("查询多个结果:{}",page );
return page.getContent();
}
public Product findOne(String id) {
LOG.info("请求id:{}",id);
Product rst = productService.findOne(id);
LOG.info("结果id:{}",rst);
return rst;
}
}
将rpc地址交给spring管理的配置类
在manager新建包configuration rpc服务端1
2
3
4
5
6
7
public class RpcConfiguration {
public AutoJsonRpcServiceImplExporter rpcServiceImplExporter(){
return new AutoJsonRpcServiceImplExporter();
}
}
可以看到日志信息 说明在manager的rpc实现导出到api中的地址成功1
22018-08-30 13:17:37.832 WARN 21224 --- [ main] o.s.c.a.ConfigurationClassEnhancer : @Bean method RpcConfiguration.rpcServiceImplExporter is non-static and returns an object assignable to Spring's BeanFactoryPostProcessor interface. This will result in a failure to process annotations such as @Autowired, @Resource and @PostConstruct within the method's declaring @Configuration class. Add the 'static' modifier to this method to avoid these container lifecycle issues; see @Bean javadoc for complete details.
2018-08-30 13:17:37.846 INFO 21224 --- [ main] c.g.j.s.AutoJsonRpcServiceImplExporter : exporting bean [productRpcImpl] ---> [/products]
saller模块:
添加api依赖,新建saller包并添加启动类1
2
3dependencies{
compile project(":api")
}
1 |
|
新建service包1
2
3
4
5
6
7
8
9
10
11
12
13
14
15
16
17
18
19
20
21
22
23
24
25
26
27
28
29
30
31
32
33
34
35
36
37
38
public class ProductRpcService {
private static Logger LOG = LoggerFactory.getLogger(ProductRpcService.class);
private ProductRpc productRpc;
/**
* 查询全部产品 暂时不分页返回
* @return List
*/
public List<Product> findAll(){
ProductRpcReq req = new ProductRpcReq();
List<String> status = new ArrayList<>();
//只能查询销售中的
status.add(ProductStatus.IN_SELL.name());
req.setStatusList(status);
LOG.info("rpc查询全部产品 请求:{}",req);
List<Product> result = productRpc.query(req);
LOG.info("rpc查询全部产品 结果:{}",result);
return result;
}
//测试类
public void testFindAll(){
findAll();
}
public Product findOne(String id){
LOG.info("单个产品请求:{}", id);
Product rst = productRpc.findOne(id);
LOG.info("单个产品 结果:{}", rst);
return rst;
}
public void testfindone(){
findOne("001");
}
添加配置文件映射rpc路径application.yml1
2
3
4
5
6server:
servlet:
context-path: /seller
port: 8082
rpc.manager.url: http://localhost:8081/manager/
新建configuration包 导出bean创建rpc客户端1
2
3
4
5
6
7
8
9
10
11
12
13
14
15
16
17
18
(basePackageClasses = {ProductRpc.class})
public class RpcConfiguration {
private static Logger LOG = LoggerFactory.getLogger(RpcConfiguration.class);
public AutoJsonRpcClientProxyCreator rpcClientProxyCreator(@Value("${rpc.manager.url}") String url){
AutoJsonRpcClientProxyCreator creator = new AutoJsonRpcClientProxyCreator();
//设置地址
try{
creator.setBaseUrl(new URL(url));
}catch (MalformedURLException e){
LOG.error("创建rpc服务地址错误",e);
}
//扫描接口
creator.setScanPackage(ProductRpc.class.getPackage().getName());
return creator;
}
}
修改路径1
bean [productRpcImpl] ---> [rpc/products]
jsonRPC
注意点:
1.不能传递复杂参数不要传递分页对象
2.路径rpc路径前不能有/
3.RPC配置类的扫描路径
JSONRPC
客户端原理
1 | logging: |
开启客户端debug log1
22018-08-30 15:28:40.612 DEBUG 31512 --- [ main] c.g.j.s.AutoJsonRpcClientProxyCreator : Scanning 'classpath:api/**/*.class' for JSON-RPC service interfaces.
2018-08-30 15:28:40.613 DEBUG 31512 --- [ main] c.g.j.s.AutoJsonRpcClientProxyCreator : Found JSON-RPC service to proxy [api.ProductRpc] on path 'rpc/products'.
1 | 2018-08-30 15:28:42.819 INFO 31512 --- [ main] saller.service.ProductRpcService : 单个产品请求:001 |
AutoJsonRpcClientProxyCreator源码
自动注入Application
从容器中获取bean之后会调用方法postProcessBeanFactory1
implements BeanFactoryPostProcessor, ApplicationContextAware
1 | private String resolvePackageToScan() { |
注册到容器1
2
3
4
5
6
7
8
9
10
11
12
13
14
15
16
17
18
19
20/**
* Registers a new proxy bean with the bean factory.
*/
private void registerJsonProxyBean(DefaultListableBeanFactory defaultListableBeanFactory, String className, String path) {
BeanDefinitionBuilder beanDefinitionBuilder = BeanDefinitionBuilder
//代理类
.rootBeanDefinition(JsonProxyFactoryBean.class)
.addPropertyValue("serviceUrl", appendBasePath(path))
.addPropertyValue("serviceInterface", className);
if (objectMapper != null) {
beanDefinitionBuilder.addPropertyValue("objectMapper", objectMapper);
}
if (contentType != null) {
beanDefinitionBuilder.addPropertyValue("contentType", contentType);
}
defaultListableBeanFactory.registerBeanDefinition(className + "-clientProxy", beanDefinitionBuilder.getBeanDefinition());
}
JsonProxyFactoryBean
1 | public class JsonProxyFactoryBean extends UrlBasedRemoteAccessor implements MethodInterceptor, InitializingBean, FactoryBean<Object>, ApplicationContextAware { |
实际与服务端交互的http方法1
2
3
4
5
6
7
8
9
10
11
12
13
public Object invoke(MethodInvocation invocation)
throws Throwable {
Method method = invocation.getMethod();
if (method.getDeclaringClass() == Object.class && method.getName().equals("toString")) {
return proxyObject.getClass().getName() + "@" + System.identityHashCode(proxyObject);
}
Type retType = (invocation.getMethod().getGenericReturnType() != null) ? invocation.getMethod().getGenericReturnType() : invocation.getMethod().getReturnType();
Object arguments = ReflectionUtil.parseArguments(invocation.getMethod(), invocation.getArguments());
return jsonRpcHttpClient.invoke(invocation.getMethod().getName(), arguments, retType, extraHttpHeaders);
}
jsonRpcHttpClient.java1
2
3
4
5
6
7
8
9
10
11
12
13
14
15
16
17
18
19private HttpURLConnection prepareConnection(Map<String, String> extraHeaders) throws IOException {
// create URLConnection
HttpURLConnection connection = (HttpURLConnection) serviceUrl.openConnection(connectionProxy);
connection.setConnectTimeout(connectionTimeoutMillis);
connection.setReadTimeout(readTimeoutMillis);
connection.setAllowUserInteraction(false);
connection.setDefaultUseCaches(false);
connection.setDoInput(true);
connection.setDoOutput(true);
connection.setUseCaches(false);
connection.setInstanceFollowRedirects(true);
connection.setRequestMethod("POST");
setupSsl(connection);
addHeaders(extraHeaders, connection);
return connection;
}
测试调用rpc路径bug1
2
3
4
5
6
7
8
9
10
11
12
13
14
15
16
17
18
19
20
21
22
23
24
25
26
27
28
29/**
* Appends the base path to the path found in the interface.
*/
private String appendBasePath(String path) {
try {
return new URL(baseUrl, path).toString();
} catch (MalformedURLException e) {
throw new RuntimeException(format("Cannot combine URLs '%s' and '%s' to valid URL.", baseUrl, path), e);
}
}
public static void main(String[] args) throws MalformedURLException {
URL baseUrl = new URL("http://localhost:8081/manager/");
String path = "rpc/products";
//只有这种是对的
//http://localhost:8081/manager/rpc/products
System.out.println(new URL(baseUrl, path).toString());
URL baseUrl = new URL("http://localhost:8081/manager");
String path = "/rpc/products";
//少了manager
//http://localhost:8081/rpc/products
System.out.println(new URL(baseUrl, path).toString());
URL baseUrl = new URL("http://localhost:8081/manager/");
String path = "/rpc/products";
//http://localhost:8081/rpc/products
System.out.println(new URL(baseUrl, path).toString());
}
服务端的运行原理
1 | logging: |
导出bean 注册接口 创建服务 映射到handler1
2
3
42018-08-30 21:48:37.315 INFO 20852 --- [ main] c.g.j.s.AutoJsonRpcServiceImplExporter : exporting bean [productRpcImpl] ---> [rpc/products]
2018-08-30 21:48:37.328 DEBUG 20852 --- [ main] c.g.j.s.AutoJsonRpcServiceImplExporter : Registering interface 'api.ProductRpc' for JSON-RPC bean [productRpcImpl].
2018-08-30 21:48:40.683 DEBUG 20852 --- [ main] c.g.jsonrpc4j.JsonRpcBasicServer : created server for interface interface api.ProductRpc with handler class com.sun.proxy.$Proxy89
2018-08-30 21:48:40.685 INFO 20852 --- [ main] o.s.w.s.h.BeanNameUrlHandlerMapping : Mapped URL path [/rpc/products] onto handler '/rpc/products'
启动客户端
收到http请求 参数是 调用方法findOne
1 | 2018-08-30 21:53:22.947 DEBUG 20852 --- [nio-8081-exec-2] com.googlecode.jsonrpc4j.JsonRpcServer : Handling HttpServletRequest org.apache.catalina.connector.RequestFacade@5681e873 |
结果 响应信息1
22018-08-30 21:53:23.025 DEBUG 20852 --- [nio-8081-exec-2] c.g.jsonrpc4j.JsonRpcBasicServer : Invoked method: findOne, result entity.Product@1f724803[id=001,name=金融1号,status=AUDITING,thresholdAmount=10.000,stepAmount=1.000,lockTerm=0,rewardRate=3.860,memo=<null>,createAt=2018-08-29 19:38:02.0,updateAt=2018-08-29 19:38:02.0,createUser=<null>,updateUser=<null>]
2018-08-30 21:53:23.064 DEBUG 20852 --- [nio-8081-exec-2] c.g.jsonrpc4j.JsonRpcBasicServer : Response: {"jsonrpc":"2.0","id":"425662322","result":{"id":"001","name":"金融1号","status":"AUDITING","thresholdAmount":1E+1,"stepAmount":1,"lockTerm":0,"rewardRate":3.86,"memo":null,"createAt":"2018-08-29T11:38:02.000+0000","updateAt":"2018-08-29T11:38:02.000+0000","createUser":null,"updateUser":null}}
服务端配置类AutoJsonRpcServiceImplExporter
实现BeanFactoryPostProcessor的方法1
2
3
4
5
6
7
8public void postProcessBeanFactory(ConfigurableListableBeanFactory beanFactory) throws BeansException {
DefaultListableBeanFactory defaultListableBeanFactory = (DefaultListableBeanFactory) beanFactory;
//<path,bean名称>
Map<String, String> servicePathToBeanName = findServiceBeanDefinitions(defaultListableBeanFactory);
for (Entry<String, String> entry : servicePathToBeanName.entrySet()) {
registerServiceProxy(defaultListableBeanFactory, makeUrlPath(entry.getKey()), entry.getValue());
}
}
1 | private static Map<String, String> findServiceBeanDefinitions(ConfigurableListableBeanFactory beanFactory) { |
chrome-network-preserve log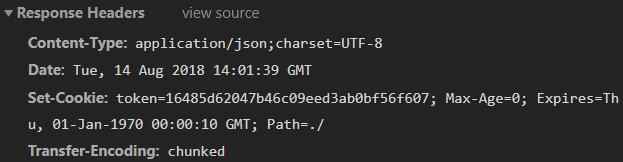
spring中自建exception类要继承RuntimeException
只有RuntimeException才会事务回滚,继承Exception不会。
使用PUT方式body要设置成x-www-from-urlencoded
过滤器:登陆、加密、解密、会话检查、图片转换。
spring通知、事务传播行为
maven依赖子类不用版本号
抓包记得开隐身窗口
注意dp[one++][two++]=dp[one-1][two-1];的执行顺序 1,1不会等于0,0
分页
List.subList(,)- SQL的
limit或者Oraclerownumselect * from t_student limit 0,10从0取10条
PostgerSQL:select * from t_student limit 10 offset 0 - hibernate:
1
2
3
4
5
6String hql = "from Student";
//创建Query或者Criteria对象
Query q = session.createQuery(hql);
q.setFirstResult(0);
q.setMaxResults(10);
List l = q.list();
对象
1 | public class Pager<T> implements Serializable{ |
InternalResourceViewResolverbean配置页面的jsp路径和后缀名JstlView
处理?clouseID=123用1
2(("courseId") Integer courseId,Model model)
model.addAttribute(course);
处理rest风格的/{courseId}1
2
3(value="/view2/{courseId}")
(("courseId") Integer courseId,Map<String,Object>model)
model.put("course",course);
在SpringMVC中使用HttpServletRequest等对象
引入1
2<groupId>javax.servlet</groupId>
<artifactId>servlet-api</artifactId>
1 | request.getParameter("courseId"); |
@ModelAttribute模型自动绑定
1 | //请求重定向 |
文件上传
表单属性enctype="multipart/from-data
action页面拦截1
2//自动转型
(("file") MultipartFile file)
common-io中的文件流操作1
FileUtils.copyInputStreamToFile(file.getInputStream,new File(""));
Json 添加依赖
1 | Course getCourseInJson(@PathVariable Integer courseId) |
数据绑定
- 基本类型int当参数不能为空,包装类型可以为null
传数组
?name=tom&name=jack&name=lucy用String[] name接收横向越权
不同用户相同权限的数据,A可以查看B的订单- 纵向:变成管理员
封装响应对象status,msg,T data
JSP
- 指令
<%@ page属性="" %>属性 language,import,contentType
include,taglib - 脚本元素
<% out.println("") %> 声明
1
2<%! String s = " ";
int add(int x,int y){return x+y;}%>表达式
<% =s %>不以分号结束
JSP声明周期
- 第一次用户请求.jsp,JSP引擎转为Servelet类(.java),生成字节码文件,执行jspInit()初始化
- 解析执行字节码文件的
jspService() jspService()处理客户端请求每个客户端一个线程。Servlet常驻内存。
JSP9大内置对象
- out对象是
JspWriter类实例。8k缓冲区 - 表单get提交数据小于2k
action=".jsp" request是HttpServletRequest的实例,
接收action的js:1
2//修改接收的字符集 与表单页面的编码一致
<% request.setCharaterEncoding("utf-8")%>
URL传参,但这种方法设置request的字符集无效,
要修改tomcat的server.xml的Connetor标签1
<a href="接收请求的.jsp?username=a">接收参数并跳转</a>
response.sendRedirect(".jsp")重定向- response中的
.getWriter得到的PrintWriter总是先于out对象输出,可以使用out.flush强制刷新输出 session对象是HttpSession类的实例。保存在服务器的内存中,保存一个用户访问一个服务器页面切换仍然是同一个用户。
用<a href=".jsp">后另一个页面仍能获得相同的sessionapplication对象是ServletContext类的实例。服务器的启动和关闭。get/setAttribute(,)page对象就是页面objectpageContext对象可以获得所有session,response等对象Config对象servlet初始化要用到的参数
请求重定向 请求转发
重定向.sendRedirect:客户端行为response对象,两次请求,第一次请求对象不被保存(重定向到的页面无法获得原来的request内容。地址栏URL变化。 (登陆失败)
转发:服务器行为。request.getRequestDispatcher().forward(req,resp)一次请求,转发后请求对象被保存(把request也转发,再把response传回原jsp),URL地址不变。(登陆成功)
登陆成功1
2session.setAttribute("loginUser",username);
request.getRequestDispatcher("success.jsp").forward(request,response);
在success.jsp获取1
<%=session.getAttribute("loginUser");
jsp动作标签和javaBean
1 | <jsp:useBean id="u" class="U" scope="page"/> |
还可以用property+value设置值,可以通过param获得url传的参数
bean的四个作用域:page,request,session,application
动作include、forward
<jsp:forward page="url"/>等同于request.getRequestDispatcher(“/url”).forward(request,response);
mina
创建连接
1 | //服务端 |
设定过滤规则
1 | DefaultIoFilterChainBuilder chain = acceptor.getFilterChain(); |
消息处理器
extends IoHandlerAdapter
重写session接收的方法
Spring配置文件
读取bean declaration
tx声明式事务配置文件
struts2
- 加入jar包:asm 替代反射,字节码操控框架;ognl struts2的标签库;xwork和webwork整合的包
- sturts.xml放入src负责Action映射和Result定义、拦截器;
<include>把每个功能的配置放到不同的xml文件里导入
动态方法调用: 解决action太多<constant name="struts.enable.DynamicMethodInvocation" value = "true"><action name = "addAction" method="add" class="">遇到add.action时调用指定类中的add 方法- 通过!add.action访问
<action><result name="add">/result.jsp</result>对应action的方法中return "add"对应result的name字符串 - 通配符
name = "{2}_*" method={1} class="..{1}Action"访问helloworld_add.action可以匹配add和helloword
默认错误路径 <default-action-ref name="index>并配置名为index的action- 参数:
<contant name="struts.action.extension value="">不用输入.action后缀
- struts.properties 全局属性文件;可以不用,在struts.xml用constant元素
- 在web.xml配置核心过滤器 core包下的;
/*.jsp和.html不拦截1
2
3
4
5
6
7
8<filter>
<filter-name>Struts2Filter</filter-name>
<filter-class>...dispatcher.ng.filter.StrutsPrepareAndExecuteFilter</filter-class>
</filter>
<filter-mapping>
<filter-name>Struts2Filter</filter-name>
<url-pattern>\*</url-pattern>
</filter-mapping>
Struts原理

HttpServltRequest经过ActionContextCleanUp、各种Filter.action的请求会到ActionMapper返回Filter- Filter发给
ActionProxy并读取struts的配置文件,找到具体的action类,通过ActionProxy代理创建Action实例 - 经过拦截器执行到action返回result是字符串对象对应视图(JSP/FreeMaker)
- 继续经过拦截器 通过
HttpServletResponse返回到用户实例进行显示
- Action搜索顺序: 顺着不存在的包名向上查,包名存在则查找action
- 动态方法调用:
URL读取html
1 | import java.net.*; |
- 意外处理
try{}catch(MalformedURLexception e) 不符合URL常规的url异常
-1
2
3URL url = new URL("https://baidu.com");
HttpURLConnection conn = (HttpURLConnection)url.openConnection();
BufferedInputStream in = new BufferedInputStream(conn.getInputStream());
tomcat
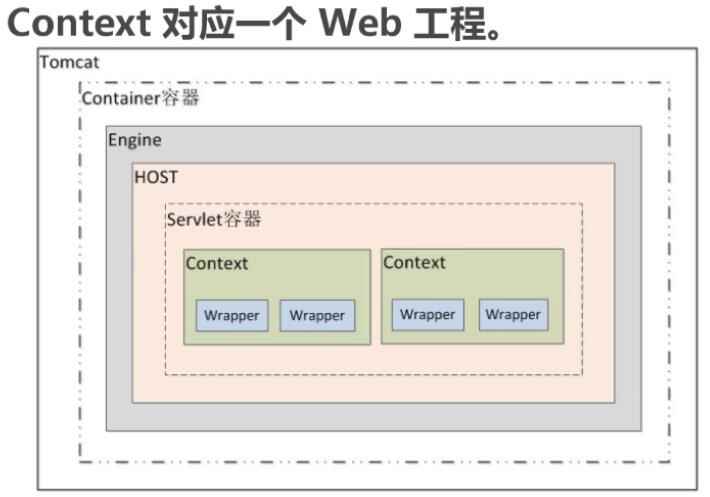
server.xml
1
2
3
4
5
6
7
8
9
10
11
12
13<server>
<service>
<Connector>
</Connector>
<Engine>
<host> 可以有多个host虚拟主机
<Context>
web应用
</Context>
</host>
</Engine>
</server>Connector 接收用户请求,Coyote实现(BIO)阻塞式IO
adddress只监听的地址
acceptCount 没有空闲线程时的排队长度默认100
maxConnections 线程池的最大值 -1 不限制- 线程池:事先创建一定数目的线程,减少了线程创建与销毁的过程
1
2<Executor name="tomcatThreadPool" namePrefix="catalina-exec-"
maxThreads="150" minSpareThreads="4"/>
- 线程池:事先创建一定数目的线程,减少了线程创建与销毁的过程
Engine 处理Connector接收到的用户请求
maven
pom 项目对象模型
<properties>中配置的常量属性可以用${property}取- 子pom和父pom可以继承覆盖
- Super POM中有默认设置
- user/.m2/repository本地缓存的仓库
- 中央仓库
生命周期
clean:清理项目pre-clean clean post-clean - default: 构建项目 validate,process-resources
运行package会自动运行compile、test
site:生成站点文档<scope>provided</scope>只在编译和测试时运行
- 依赖范围:
<scope>6种- compile:默认。编译测试运行都有效。
- provided在编译和测试时有效,运行无效。例如servlet-api因为web容器已经有api了
- runtime:运行、测试有效。例如jdbc驱动api
- test:测试时有效。例如junit
- system:编译和测试有效,不可移植,与系统相关联。例如引入本地的JAVA_HOME
- import:只用在dependencyManagement中,表示从其它pom中继承的依赖。
命令
mvn complie编译 test测试 package打包
clean删除target
install安装jar包到本地仓库
archetype插件 建立符合规定的目录骨架
mvn archetype:generate
git
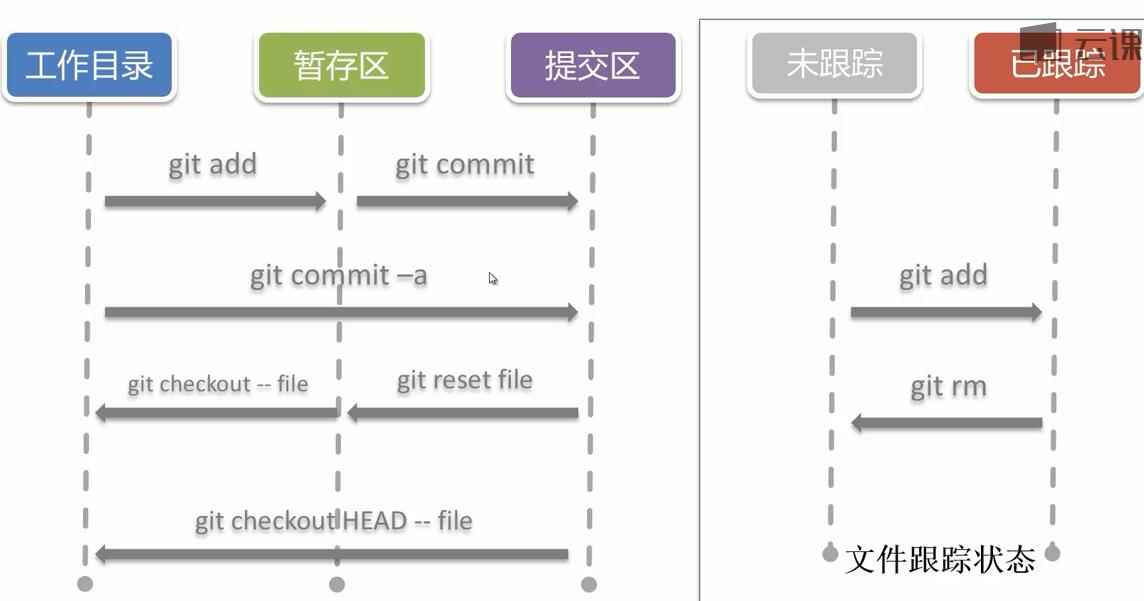
git push -u origin master
Servelet:运行在server端的java程序
- 1.java类 没有main方法 2.运行于容器 提供请求-响应的web服务
servlet处理流程
pom.xml:tomcat:
1
2
3<configuration>
<path>/web_project_template</path>
</configuration>servlet容器的配置文件web.xml找到对应的Servlet,转发到service方法
1
2
3
4
5
6
7
8<servlet>
<servlet-name>TestServlet</servlet-name>
<servlet-class>..TestServlet</servlet-class>
</servlet>
<servlet-mapping>
<servlet-name>TestServlet</servlet-name>
<url-pattern>/hello</url-pattern>
<servlet-mapping>客户端请求http对象的时候service方法被调用
- 客户端使用get方法访问时doGet方法被调用
TestServlet.java1
2
3
4
5
6
7
8
9
10
protected void doGet(HttpServletRequest req, HttpServletResponse resp)
throws ServletException, IOException {
System.out.println("doGet method");
PrintWriter pw = resp.getWriter();
//设置文件类型
response.setContentType("text/html;charset=utf-8")
pw.print("/hello");
pw.close();
}
Servlet 生命周期
生命周期方法由服务器调用- 默认web客户端第一次请求容器,创建servlet实例 调用init(ServletConfig)
- 请求处理 转发请求
- destory
get通过header传输数据,post通过body传输
ServletConfig:以servlet为单位
1
2
3
4
5
6
7
8
9
10
11
12<servlet>
<init-param>
<param-name>data1</param-name>
<param-value>value1</param-value>
</init-param>
<init-param>
<param-name>data2</param-name>
<param-value>value2</param-value>
</init-param>
<servlet-name></servlet-name>
<servlet-class></servlet-class>
</servlet>1
2ServletConfig config = this.getServletConfig();
String v1 = config.getInitParameter("data1");context-param :全局配置
ServletContext对象 web应用中全局唯一
1
2
3
4<context-param>
<param-name>globalData1</param-name>
<param-value>123</param-value>
</context-param>1
2ServletContext ctx = this.getServletContext();
String v1 = ctx.getInitParameter("data1");
servletContext 可以CLUD共享不是事先知道的动态信息
1
2//在context中设置属性
ctx.setAttribute("attribute1", "111");读取外部资源配置文件信息:
ServletContext.getResource:URL
.getResourceAsStream
.getRealPath:File
???Properties对象web.xml 部署描述符
为一个servlet配置多个url-pattern、/*模糊匹配1
2
3
4<servlet-mapping>
<servlet-name></servlet-name>
<url-pattern>/hello/*</url-pattern>
</servlet-mapping>匹配优先级规则
监听器
- 用途:
- 统计在线人数和在线用户 HttpSession
- 系统启动时加载初始化信息 缓存、数据库链接ServletContext
- 统计网站访问量
- spring相关
用法:
impletemts ServletContextListener在web.xml注册
1
<listener><listener-class></listener-class></listener>
上下文对象,web启动时创建,web销毁 销毁
- 监听器的启动循序按注册顺序。
优先级:监听器>过滤器>servlet加载 - 监听器种类
ServletContext监听应用程序环境对象HttpSession用户会话对象ServletRequest请求消息对象
MIME 多用途 互联网 邮件 扩展 类型
设定某种扩展名的文件用什么应用打开
1
2
3
4
<mime-mapping>
<extension>java</extension> 扩展名映射类型
<mime-type>text/plain</mime-type>
</mime-mapping>
Session & Cookie
- Cookie 短时间,数据频繁访问 保存在客户端
- V0:
- Set-Cookie: userName= “”;
- Domain= “”
- V1:
- Max-Age= 1000
- 实际:
- Version= “1”
- V0:
- Session NANE为JSESIONID的 Cookie 保存在服务端
Cookie
- 会话cookie 关闭浏览器消失,保存在内存中
- setMaxAge 设置cookie有效期,浏览器会把cookie保存到硬盘上
- 一个站点最多能保存20个cookie,每个4k以内
cookie1
2
3
4
5
6
7
8
9
10
11
12
13
14
15
16
17
18
19
20
21
22/***第一次请求把cookie设置好**/
Cookie userNameCookie = new Cookie("userName", userName);
Cookie pwdCookie = new Cookie("pwd", userPassword);
/***设置时间**/
userNameCookie.setMaxAge(10 * 60);
pwdCookie.setMaxAge(10 * 60);
/***把cookie放到响应中**/
response.addCookie(userNameCookie);
response.addCookie(pwdCookie);
/***第二次从请求中获取cookies数组**/
Cookie[] cookies = request.getCookies();
//第二次
if (cookies != null) {
for (Cookie cookie : cookies) {
if (cookie.getName().equals("userName")) {
userName = cookie.getValue();
}
if (cookie.getName().equals("pwd")) {
userPassword = cookie.getValue();
}
}
}
Session
- 默认有效期30分钟
setMaxInactiveInterval设置有效期 - 部署描述符设置有效期
invalidateSession失效
第一次请求:服务器创建session对象,把SessionID作为cookie发送给浏览器
1
2
3
4
5
6
7
8
9
10//创建Session对象
HttpSession session = request.getSession();
session.setAttribute("userName", userName);
// 第二次请求
String name = (String) session.getAttribute("userName");
if (name != null) {
//服务器已经保存了session
System.out.println("second login: " + name);
}第二次 Request:
Cookie: JSESSIONID=B2980D3ABAB39EF6EA09F278F261C2A4;
Session钝化:不不常使用的session对象序列化到文件/数据库
tomcat两种钝化管理器
StandardManger- tomcat 关闭重启时,web应用重启时(覆盖了web.xml),钝化到文件。
钝化到/work/Catalina/hostname/applicationname/SESSION.ser重启时加载删除
- tomcat 关闭重启时,web应用重启时(覆盖了web.xml),钝化到文件。
- Persistentmanager
Servlet3.0
@WebListner免注册声明为监听器转发与重定向
- 转发对象:
RequestDispatcher(".jsp").forward(request,response) - 重定向:是两次请求 获取不到原来的req
tail -f 监视日志输出
- javax.servlet
- Servlet 所有Servlet必须实现的方法
- Config Servlet配置信息
- Context 容器信息
- GenericServlet底层(实现了5个servlet中的方法)
- javax.servlet.http
- HttpSession标识并存储客户端信息
- HttpServletRequest
- getParameter(String key)获得第一个name和key一样的表单控件的数据
- getParameterValues同上返回数组
- getParameterMap 返回kv
- getParameterNames 返回所有表单控件的name值
- HttpServlet 扩展GenericServlet
- Cookie 存储Servlet发送给客户端的信息
- javax.servlet.annotation 注解
javaWeb域对象:存、取数据(Map)
- Java Web四大域对象(PageContext、ServletRequest、HttpSession、ServletContext)